Shelf Wallpaper: 15 Ideas to Refresh Any Room

Shelf Wallpaper Ideas That Transform Rooms
Shelf wallpaper is peel-and-stick or traditional paper applied to the back panel of a bookcase, cube organizer, or open shelf. It adds color and pattern behind your objects, making room decor feel layered, custom, and personal without painting a single wall.
These 15 ideas cover dorm room ideas, home decor ideas, the Anthropologie home aesthetic, and posters for room styling. Each idea lists materials, sizes, and cleanup tips, so you can choose a pattern, protect your furniture, and finish the project in a single afternoon.
Measure the back panel before you shop, order a sample first, and clean the surface well. Peel-and-stick works best on smooth, sealed panels, while rough or unfinished boards may need primer. The table below compares cost and time for every idea.
| Idea | Cost | Time | Best For |
|---|---|---|---|
| 1. Floral dorm cubby | $ | 1 hour | Dorm rooms |
| 2. Bold cube organizer | $ | 90 minutes | Playrooms and bedrooms |
| 3. Poster-style shelf back | $ | 45 minutes | Renters with no drilling |
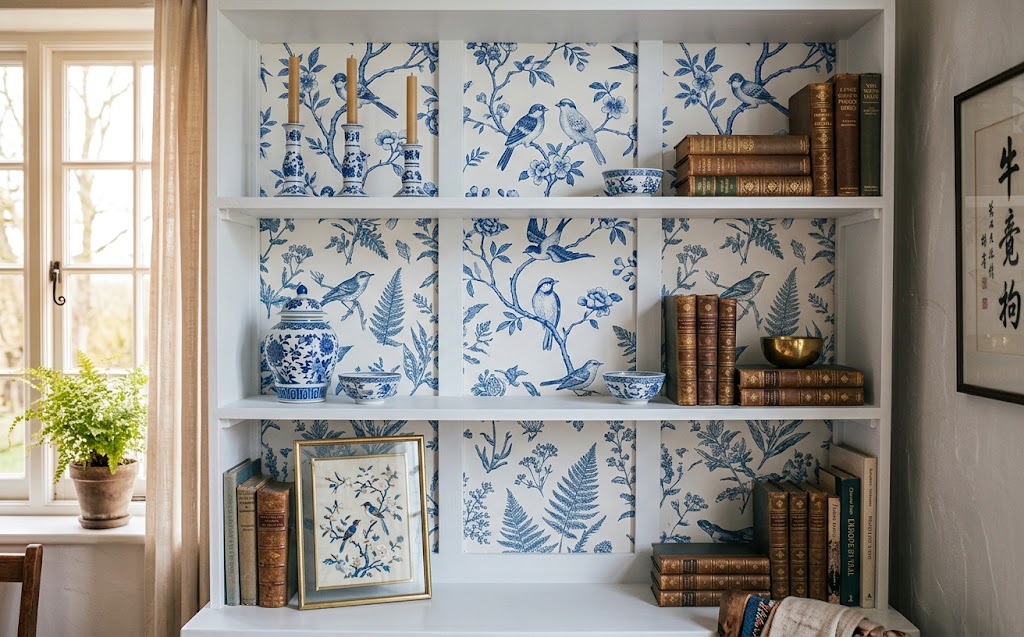
| 4. Botanical toile | $$ | 2 hours | Cottage-style bookcases |
| 5. Blue chinoiserie | $$$ | 2 hours | Living and dining rooms |
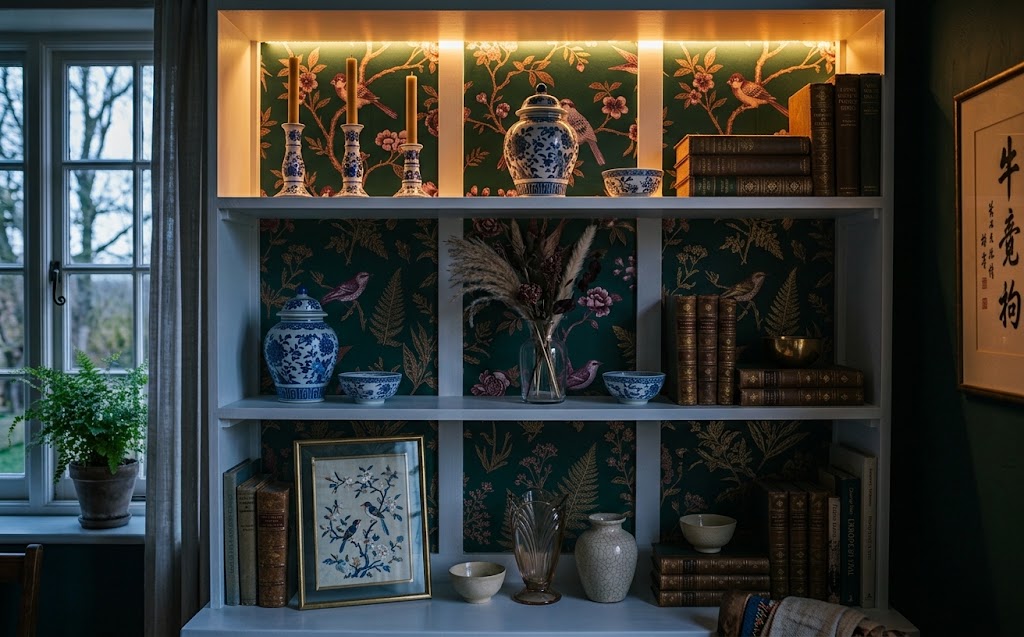
| 6. Dark floral | $$ | 90 minutes | Moody, gallery looks |
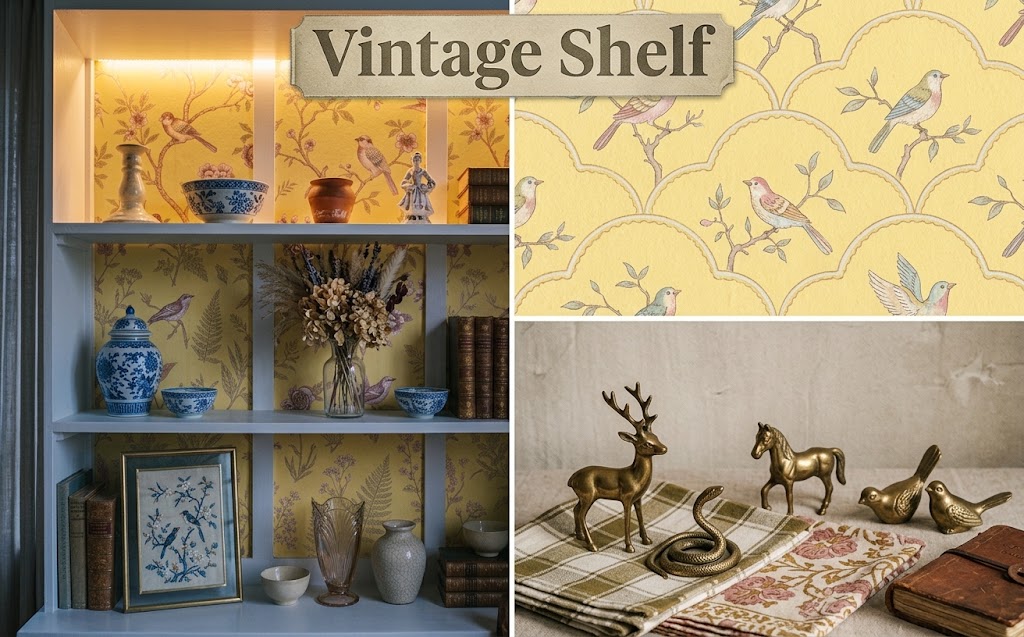
| 7. Scalloped vintage | $$ | 1 hour | Playful boutique style |
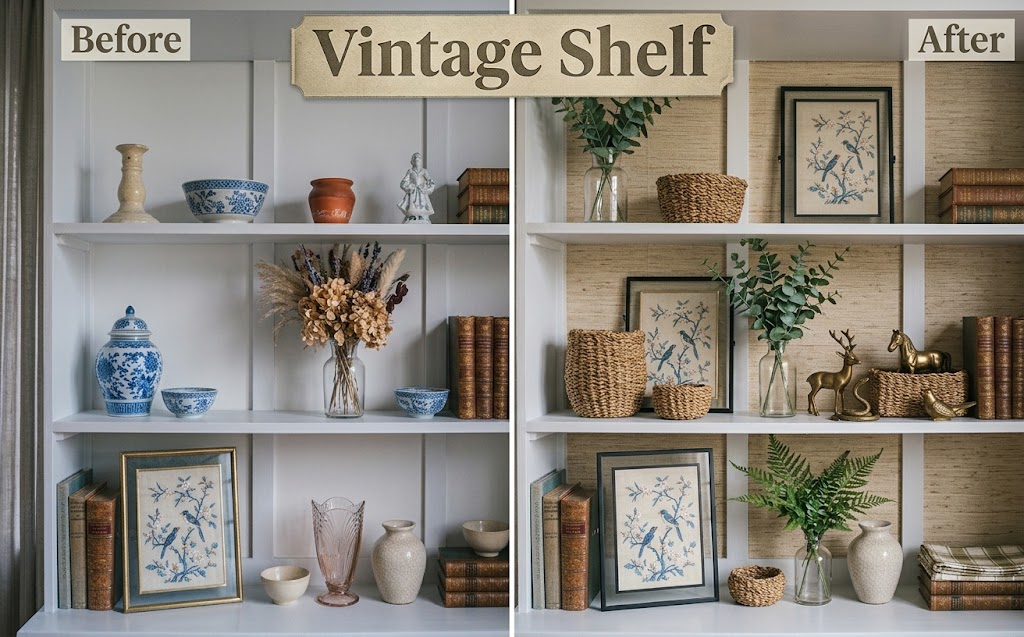
| 8. Grasscloth look | $$$ | 3 hours | Built-in bookcases |
| 9. Kitchen tile print | $$ | 2 hours | Open kitchen shelves |
| 10. Striped china hutch | $$ | 90 minutes | Dated hutches |
| 11. Entryway ledge band | $ | 45 minutes | Small entryways |
| 12. Measure and cut guide | $ | 30 minutes per panel | First-time installers |
| 13. Frames and decor mix | $ | 1 hour | Styling the finished shelf |
| 14. Hidden LED glow | $$ | 1 hour | Evening ambiance |
| 15. Seal and remove | $ | 30 minutes | Renters and deposits |
Shelf Wallpaper Ideas for Dorm Room Style
1. Line a Dorm Cubby Shelf With Floral Paper
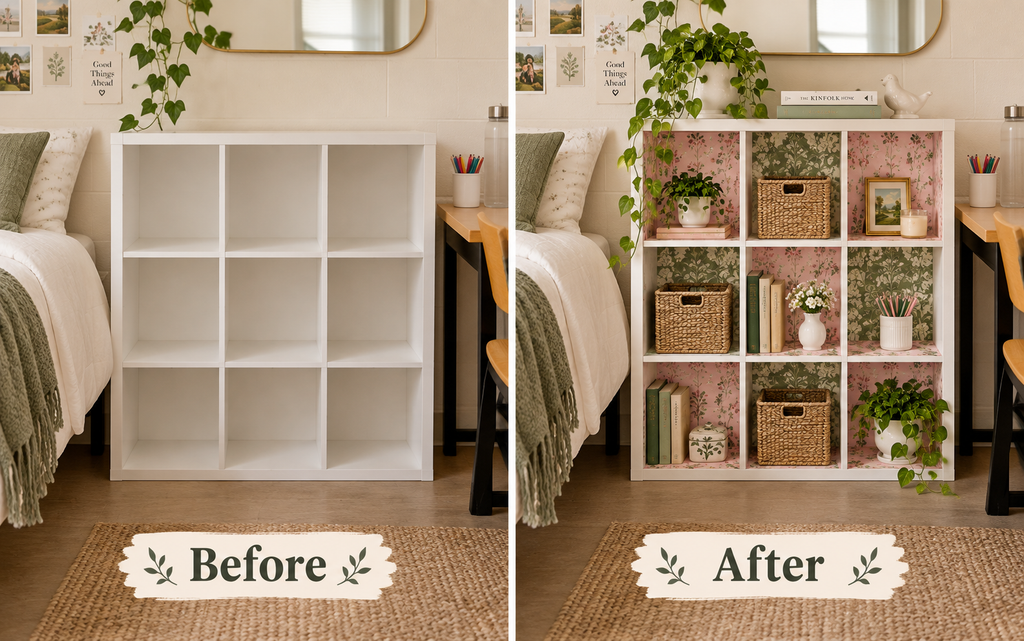
A floral cubby shelf is one of the cutest dorm room ideas because it adds personality without breaking campus rules. Line the back of each cube with peel-and-stick floral wallpaper, then fill the cubes with baskets, books, and small plants.
Cut each piece about half an inch larger than the cube, press it from the center outward, and trim the excess with a sharp craft knife. Smooth bubbles with a credit card. Work one cube at a time for clean corners.
Pick small-scale flowers in soft pink, cream, and sage so the pattern stays pretty behind objects. Large prints get hidden by books. Repeat the same paper in every cube for a calm look, or alternate two coordinating prints. Sample swatches help you judge the colors.
Plan about one hour and fifteen to thirty dollars for a standard cube organizer. Choose removable paper, and test a small piece first so you get your deposit back. Peel slowly at move-out, warming the edges with a hair dryer.
2. Cover a Cube Organizer Back in Bold Prints
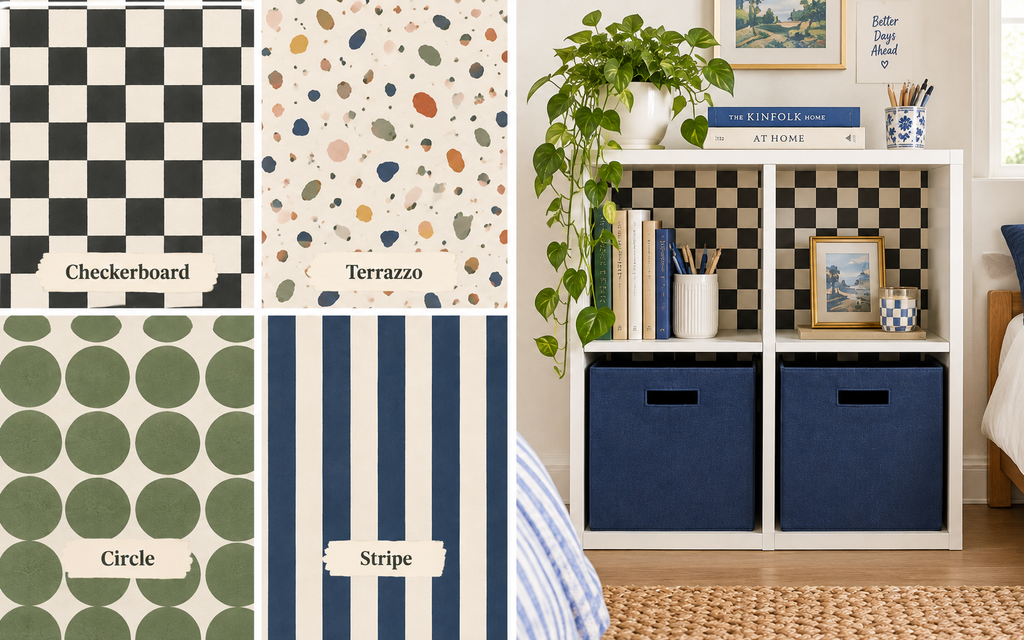
Bold geometric or checkerboard paper turns a basic cube organizer into a statement piece. Cover only the back panels, then use fabric bins in a matching color. This quick upgrade works for dorm rooms, bedrooms, and playrooms with limited decorating options.
Choose high-contrast prints like black and white checks, terrazzo, or large circles. Patterns that repeat evenly are easier to line up across several cubes. Match the pattern direction before cutting, and label each piece on the back so installation goes smoothly.
Stack two organizers side by side and run one continuous strip across both for a built-in look. Add small LED puck lights inside a few cubes for evening glow. Anchor tall organizers to the wall so they cannot tip. Keep power cords tucked behind the units.
Expect about ninety minutes and twenty to forty dollars. Wipe the panels with a damp cloth first, because dust and oils weaken the adhesive. Keep leftover paper in a tube so you can patch a torn corner later. Press edges again after one day.
3. Frame Posters for Room Style on Shelf Backs
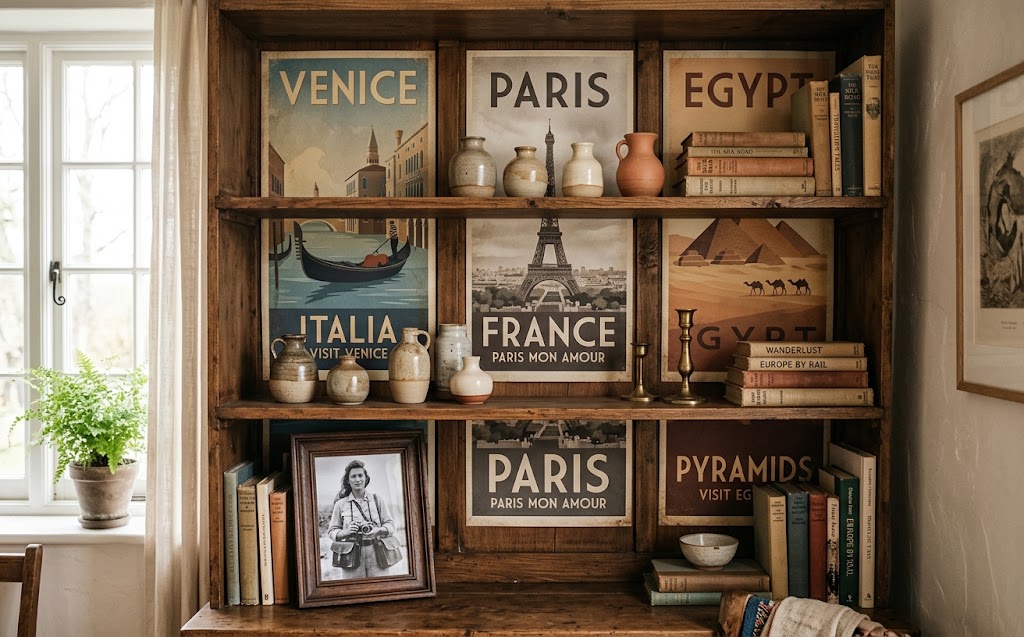
Posters for room style do not always need walls. Mount favorite prints or poster-sized wallpaper panels on the back of a tall shelf, then arrange books and objects in front for a layered, gallery-inspired look. This idea suits students who cannot drill into painted walls.
Cut poster-size wallpaper sections, or use full-size posters with removable adhesive strips, and fix them behind each shelf row. Keep the images in one color family. A series of three vertical prints looks neat and intentional. Overlap neighboring posters by a quarter inch to hide gaps.
Choose images with calm backgrounds, such as landscapes, botanicals, or vintage travel art, so objects on the shelf remain visible. Dense graphics compete with books and decor. Add a small frame or two in front for dimension. Matte prints reduce glare from lamps and windows.
Allow about forty-five minutes and ten to thirty dollars. Use removable adhesive instead of tape to avoid residue on the back panel. Check out these wall art decor ideas for more ways to display prints. Mark the corners lightly in pencil first so the posters hang straight.
Anthropologie Home Aesthetic on Your Shelves
4. Hang Botanical Toile Behind Your Bookcase
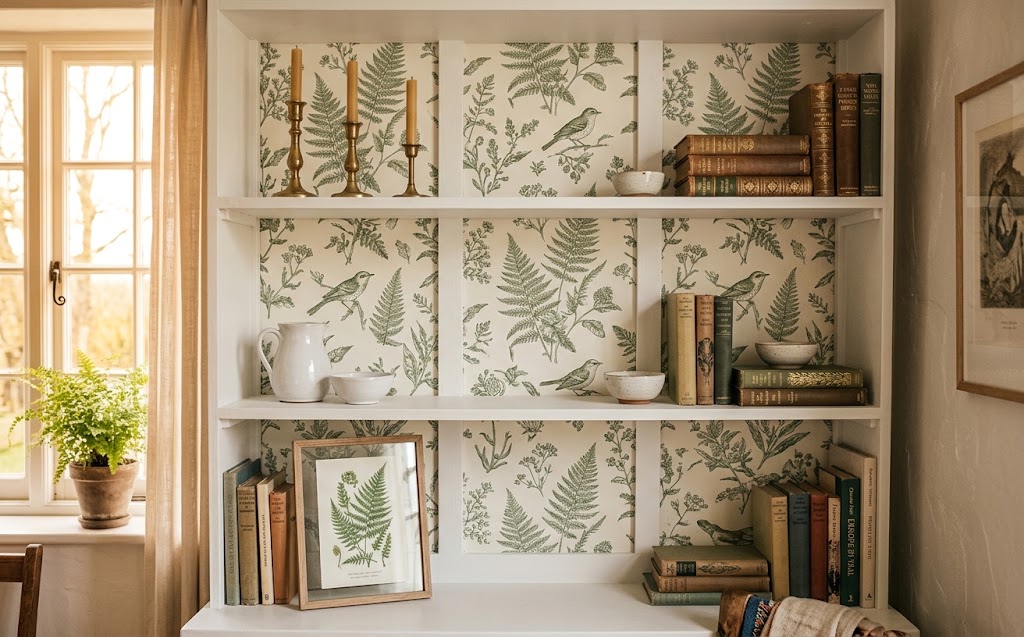
Botanical toile brings a storybook, garden-party feeling to bookcases. Choose a pattern with ferns, birds, or wildflowers in sage, cream, or navy, then apply it behind the shelves to create a charming backdrop for ceramics, candles, and vintage books. Soft greens also pair nicely with natural wood.
Toile is a pattern with one color on a pale background, so it calms a busy shelf. Pair it with brass candlesticks, white pottery, and small framed prints. Keep objects at different heights to stop the pattern from looking flat.
Match the paper’s repeat when you cut each panel. Lay the roll flat, mark the pattern, and align edges before pressing down. If your bookcase has several sections, number the pieces on the back to avoid mixing them up. Careful matching keeps the pattern flowing between shelves.
Plan one to two hours and twenty-five to sixty dollars. Order a sample swatch before buying, since colors look different in sunlight and lamplight. Store extra paper flat and away from heat to prevent curling. Wait a full day before loading heavy books.
5. Try Blue and White Chinoiserie on Shelves
Blue and white chinoiserie wallpaper gives a bookcase a refined, collected feeling. Apply it to the back panels, then add white ceramic jars, ginger-jar lamps, and leather-bound books for a classic look that suits living rooms and dining spaces. The look feels classic yet surprisingly fresh.
Choose a pattern with open space around each branch or bird, so display pieces do not clash. Large scale motifs look dramatic on tall shelves, while smaller prints suit compact units. Hold the roll up behind the shelf before buying.
Keep the objects mostly white, blue, or natural wood to avoid visual noise. Add one warm accent, like a brass bowl, for contrast. Group items in threes, and leave some empty space so the pattern still shows through. This keeps the display calm and elegant.
Expect about two hours and thirty to ninety dollars, depending on the paper. Use a smoothing tool and a sharp blade for clean edges. Traditional paste-the-wall paper needs more patience, so beginners should start with peel-and-stick. Order one extra roll if the pattern is large.
6. Make Shelves Moody With Dark Floral Paper
Dark floral wallpaper makes shelves feel rich, moody, and gallery-like. Choose a deep green, navy, or plum paper with blooms, then style the shelves with gold frames, candlesticks, and glass vases that pop against the dark background. The contrast makes everyday objects feel carefully curated.
Dark paper hides shadows and makes light-colored objects glow. Add warm LED lighting under the top shelf to highlight the pattern. Avoid very glossy papers, which reflect lamps and create glare on the shelf surface. Test the lighting after dark, since glare shows up quickly at night.
Limit the shelves to one or two metallics, such as brass or gold, so the display feels deliberate. Pair white books and cream pottery with a few green plants. Contrast gives dark wallpaper an elegant, boutique feeling. Fewer finishes make the shelves look intentional and polished.
Plan about ninety minutes and twenty-five to seventy dollars. Dark papers show seams more, so overlap edges neatly and trim straight. Keep the room’s wall color lighter, such as warm white, so the shelf becomes the focal point. A razor blade makes cleaner cuts.
7. Layer Scalloped Paper for Soft Vintage Charm
Scalloped and quilted patterns suit the Anthropologie home aesthetic, which leans toward vintage charm, florals, and layered textures. Use scalloped paper in cream, butter yellow, or soft pink behind shelves to create a playful, boutique-style backdrop. Soft colors keep the pattern sweet instead of busy.
Pair the paper with mismatched ceramics, brass animals, vintage books, and dried flowers. Collected pieces look best when they share one or two colors. Add a small stack of tea towels or scarves for extra softness. Flea market finds make the shelves feel layered and personal.
Mix patterns carefully by keeping scale different. A small-scale scalloped back works well with a large-scale rug nearby. Avoid putting two strong prints on the same shelf, because they compete for attention and look messy. Repeating one color across both patterns helps them feel connected.
Allow about one hour and twenty to fifty dollars. Thrift stores and flea markets supply low-cost ceramics and frames. Store the leftover roll upright in a tube to keep the scallops crisp for later repairs. Keep a spare piece for patching small tears at the corners.
Smart Home Decor Ideas Using Shelf Wallpaper
8. Back Built-In Bookcases With Grasscloth Look
Textured grasscloth-look wallpaper adds warmth to built-in bookcases without the cost of real grasscloth. Apply it to the back panels in natural tan or oatmeal, and the shelves instantly look custom, collected, and expensive. Neutral tones also let books and objects stand out clearly.
Pair the texture with matte black frames, woven baskets, and white ceramics for a calm, modern organic look. Natural materials stay in harmony with the paper. Add a few green stems for color and life. The result feels warm, grounded, and effortlessly collected over time.
Textured paper hides small wall flaws, which helps older built-ins. Still, sand rough spots, wipe away dust, and prime unfinished wood first. Press the paper firmly into corners so edges do not lift over time. Smooth peel-and-stick still needs a flat surface, so repair deep dents first.
Expect about two to three hours and forty to one hundred twenty dollars for a full built-in. Hire a pro for very tall or complex units. Measure twice, and order extra paper to cover mistakes and pattern matching. Work in sections to keep alignment accurate.
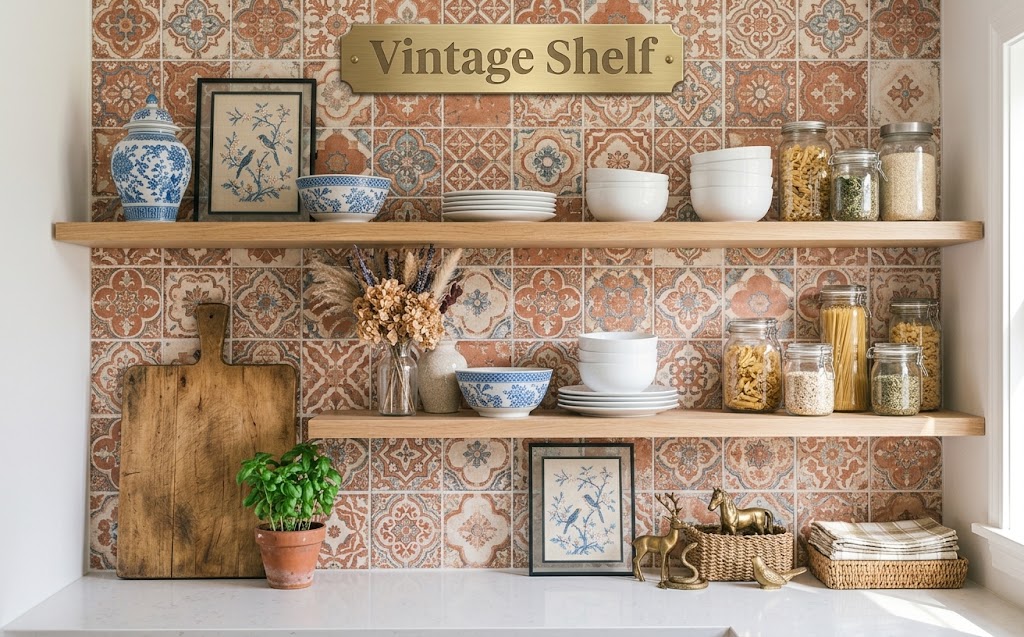
9. Brighten Kitchen Open Shelves With Tile Print
Tile-print wallpaper behind kitchen open shelves gives the look of a backsplash at a fraction of the cost. Choose a washable vinyl in white, blue, or terracotta tile patterns, and display dishes, jars, and cookbooks in front. The effect looks surprisingly convincing from a few feet away.
Pick a wipeable, moisture-resistant paper, and keep it away from direct stove heat and splashes. Seal edges with clear caulk where shelves meet the wall. Cleaning with a soft damp cloth keeps the pattern looking fresh. Check the label for washable or scrubbable ratings before buying.
Style the shelves with matching white dishes, wooden boards, and plants. Browse these kitchen decor ideas to coordinate colors across the room. A bold tile paper with simple dishes looks balanced and tidy. Keep everyday items within easy reach, and store rarely used pieces higher.
Allow about two hours and thirty to eighty dollars. Clean grease from the surface with a degreaser and dry fully before applying. Replace any panel that peels near heat, and avoid placing it directly beside burners. Use a hair dryer to lift any bubble that forms.
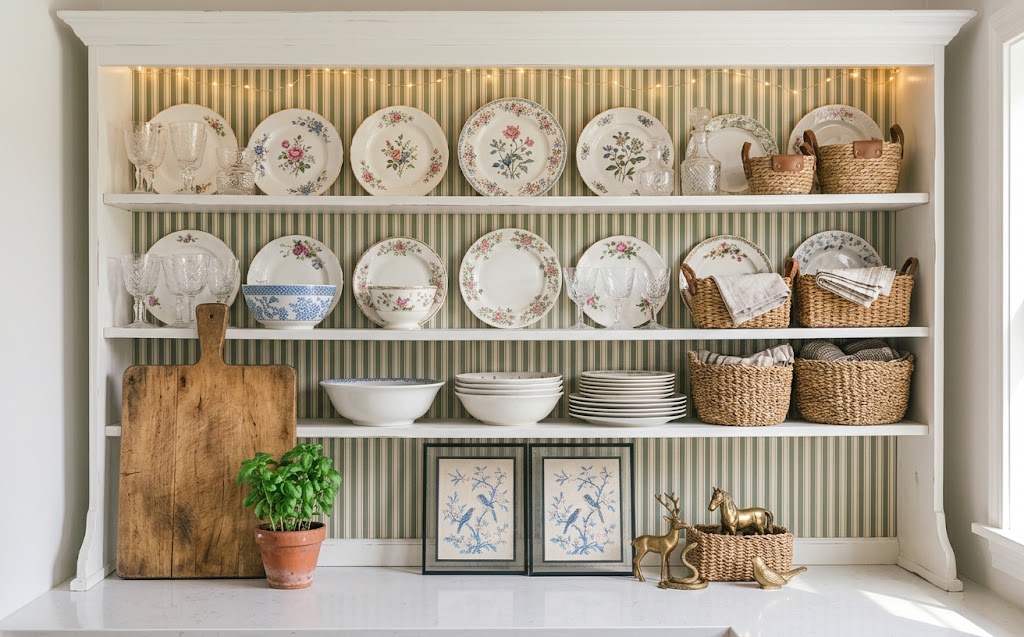
10. Add a Striped Paper Backdrop to a China Hutch
A striped backdrop refreshes an old china hutch or hutch-style bookcase quickly. Use narrow stripes in cream and sage or navy and white, then display plates, glassware, and baskets so the lines frame everything neatly. The effect is bright, tidy, and easy to maintain.
Vertical stripes make cabinets feel taller, and horizontal ones make them feel wider. Use a level and a pencil to keep every line straight. Cut panels slightly long, then trim with a sharp blade for crisp edges. Take your time lining up the first strip carefully.
Stripes pair well with floral dishware, vintage glass, and woven placemats. Keep serving pieces in two or three colors for a tidy result. Add a small string of battery lights across the top shelf for evening charm. Odd numbers of items look more relaxed than pairs.
Plan about ninety minutes and twenty to fifty dollars. Remove the shelves before papering, then reinstall them. Check that glass doors still close, since thick paper edges can bind against narrow cabinet frames. Clean the panel and let it dry fully so the adhesive grips evenly.
11. Decorate an Entryway Ledge With Color Paper
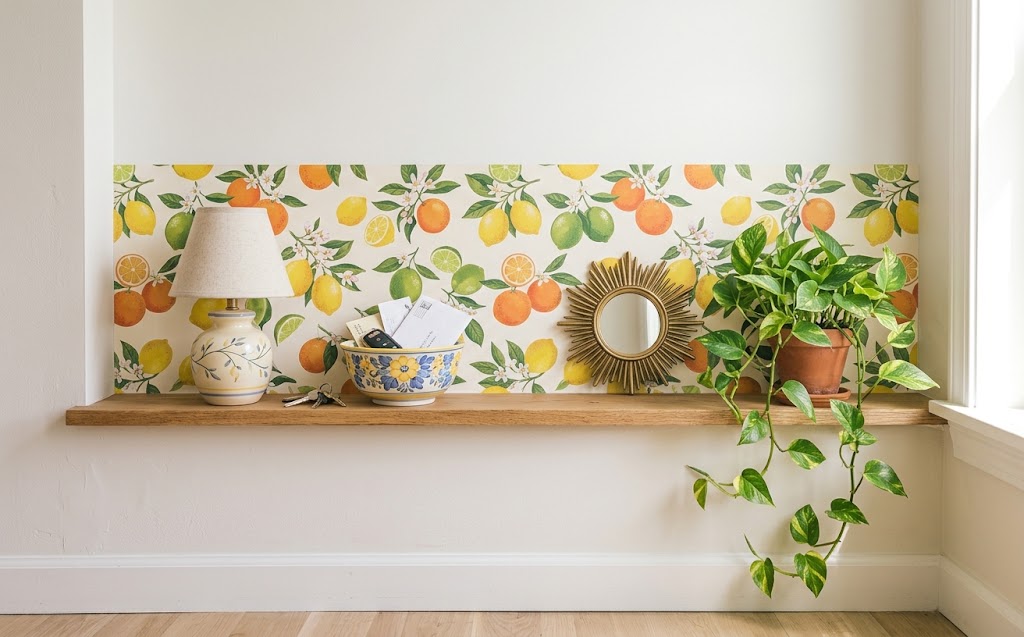
A narrow entryway ledge looks richer with a strip of colorful wallpaper behind it. Cut a band about twelve inches tall, apply it above the ledge, and place keys, a small lamp, and a framed print on the shelf. It makes a small entry feel welcoming right away.
Choose bright, cheerful patterns like citrus, stripes, or abstract shapes to welcome guests. A band of wallpaper acts like a mini mural, so it needs very little paper. Frame the top edge with thin molding for a custom finish. Bright color near the door sets a happy tone.
Keep the shelf styled lightly with a bowl, a plant, and a small mirror. Too many objects hide the pattern. Add adhesive hooks beside the shelf for coats and bags, which helps the area stay tidy. A tray corrals small items neatly and keeps clutter under control.
Allow about forty-five minutes and under thirty dollars. Measure the wall carefully, and mark level lines with painter’s tape before cutting. Scrap pieces from other projects often supply enough paper for a narrow band like this. Press the paper firmly along the ledge so edges stay flat.
Room Decor Tips for Installing Shelf Wallpaper
12. Measure and Cut Shelf Wallpaper Like a Pro
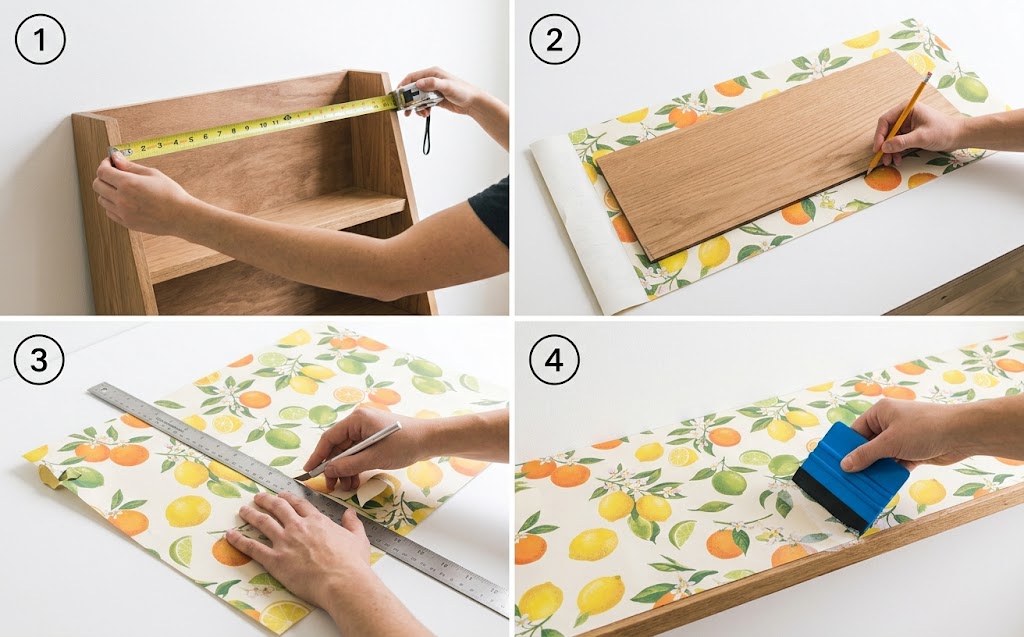
Accurate measuring is the foundation of every shelf wallpaper project. Measure the width and height of each back panel in inches, then add one inch to every side so you can trim the paper neatly once it is applied. Careful numbers prevent expensive mistakes later.
Remove books and shelves, wipe the back panel with a damp cloth, and let it dry. Unroll the paper face down, trace the panel on the backing, and cut with a sharp craft knife and metal ruler for straight lines.
Peel two inches of backing, align the top edge, and press down. Continue peeling as you smooth from the center outward with a squeegee or credit card. This method pushes air out and prevents bubbles and wrinkles. Take your time near corners, where wrinkles show most.
Plan about thirty minutes per panel. Replace blades often, since dull knives tear vinyl. Keep a hair dryer nearby to gently warm and reposition crooked sections. Take photos of your measurements so reordering later is simple. Label each panel’s top edge so you never rotate it accidentally.
13. Mix Wallpaper With Frames and Room Decor
Shelf wallpaper works best when it supports the rest of your room decor instead of competing with it. Choose a paper that repeats one or two colors from your rug, bedding, or curtains, then style the shelves to match. Repeating colors makes the whole room feel pulled together.
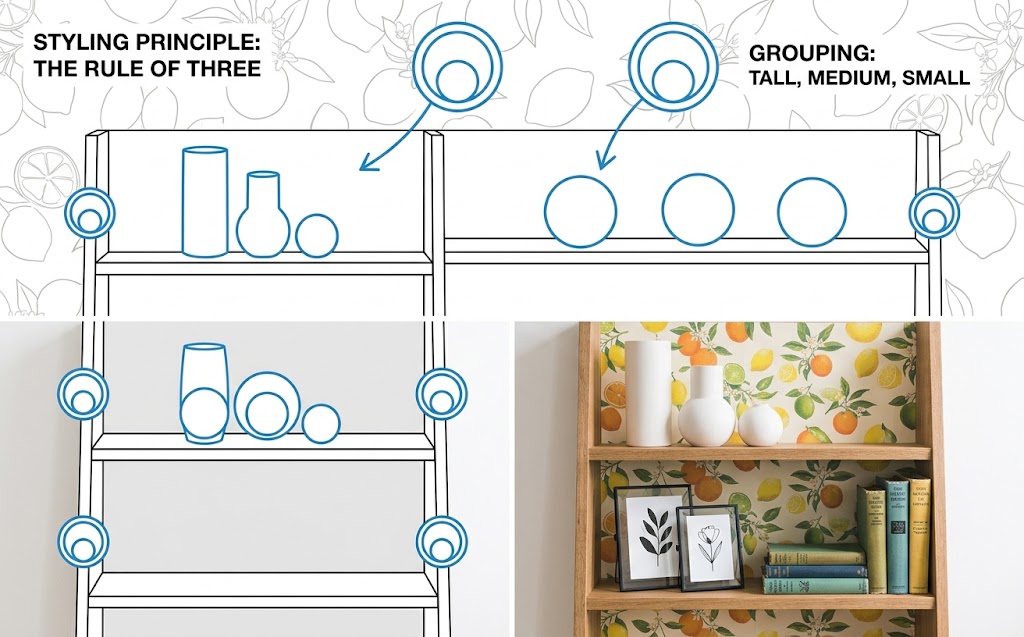
Layer objects in front of the paper using the rule of three. Place a tall item, a medium item, and a small one in each group. Add framed prints and mirrors leaning against the back for depth. Odd groupings feel natural and keep the display balanced.
Combine patterned wallpaper with solid decor, such as plain ceramic vases and white books, so the pattern remains the star. Rotate seasonal pieces like pumpkins, ornaments, or fresh flowers. Keep a few empty gaps so the display breathes. Plain pieces give the eye a place to rest.
Allow about one hour for styling after the paper is up. Step back and photograph the shelves, because a photo shows imbalance quickly. Adjust items until the colors, heights, and spacing feel even across every row. Small tweaks to spacing often make the biggest difference.
14. Light Shelf Wallpaper With Hidden LED Strips
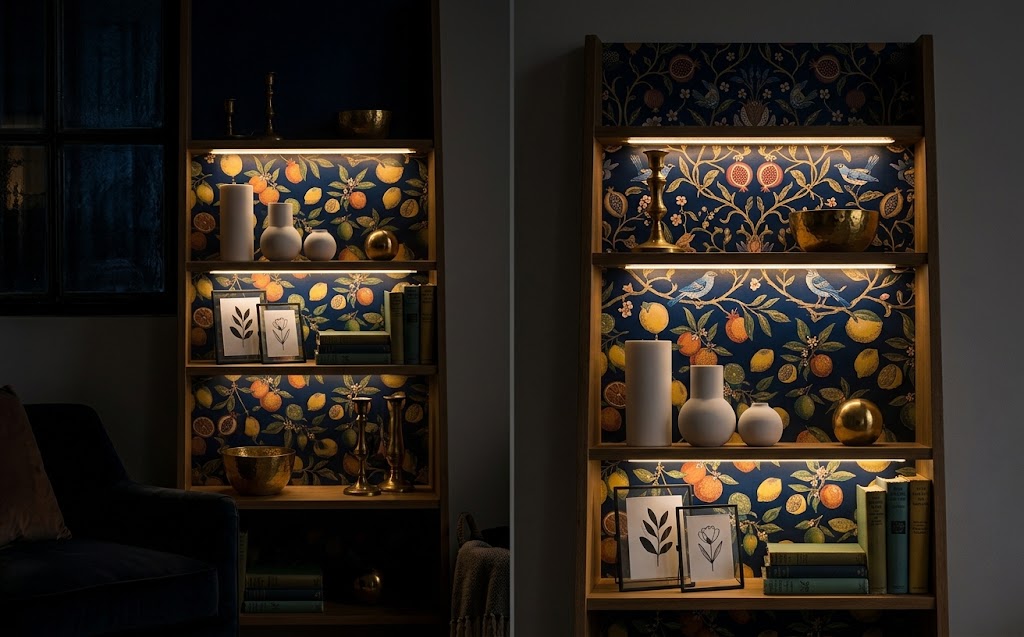
Hidden LED strips make shelf wallpaper glow, especially at night. Run a thin warm-white strip along the underside of each shelf or the top front edge, so the light grazes the pattern and highlights texture and color. This soft glow adds depth behind books and objects.
Choose LED strips labeled warm white, around 2700 to 3000 Kelvin, and avoid cool white that can wash out wallpaper. Use plug-in or battery-powered strips for easy installation. Clip the wires neatly against the shelf side. Check the packaging for a dimmable option if you want flexibility.
Install the lights before wallpapering when possible, so cords stay hidden behind trim. Dark and metallic papers look especially dramatic with soft lighting. A small dimmer lets you adjust brightness for movie nights or reading. Pre-drill any mounting points so the shelf finish stays clean.
Expect about one hour and fifteen to thirty-five dollars for strips and a plug. Keep adhesive strips away from wallpaper edges, and never cover warm power adapters. Use LED only, because heat from other bulbs can warp paper. Test the strips before sticking them down.
15. Seal and Remove Your Shelf Wallpaper Safely
Planning for removal protects your furniture and your deposit. Choose peel-and-stick wallpaper labeled removable, test a small corner for a week, and avoid pressing too hard on delicate laminate or thin cardboard backing. Doing this early prevents torn backing, sticky residue, and stressful move-out surprises.
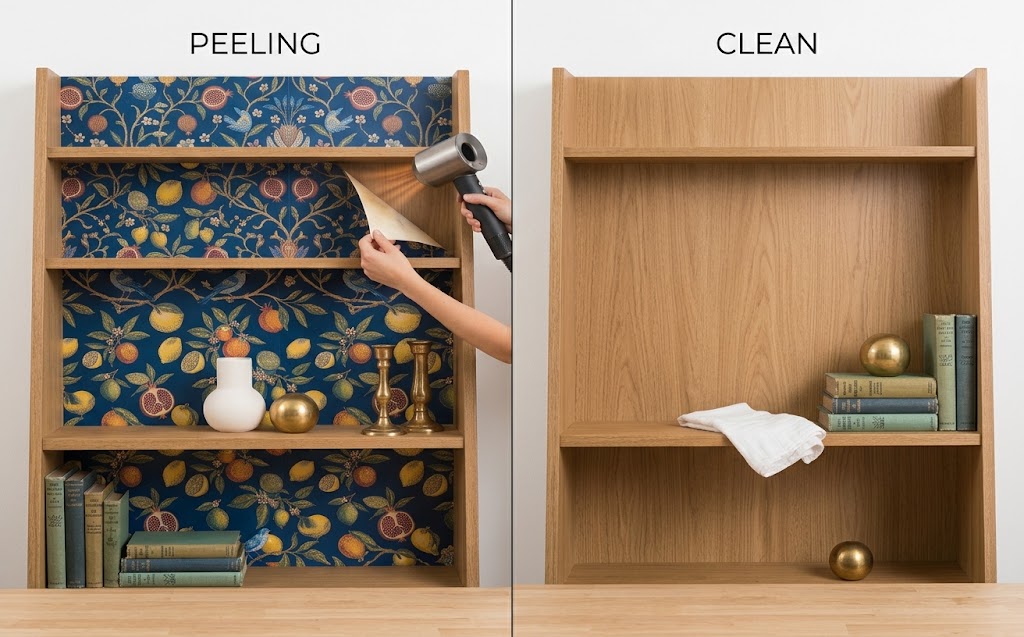
To remove it, warm the paper with a hair dryer on low for thirty seconds, lift one corner, and peel back slowly at a low angle. Stopping and reheating prevents tearing. Wipe leftover adhesive with warm soapy water. Patience here protects the finish underneath.
Some adhesives bond strongly to raw wood or older paint. Seal unfinished panels with a clear primer before applying wallpaper, which gives the paper a smoother surface and cleaner removal. Test any cleaner on a hidden spot first. A thin primer coat also protects fragile surfaces.
Allow about thirty minutes per shelf for removal. Keep the original roll label and note the product name, in case adhesive questions arise later. Replace curling edges with a small dab of removable adhesive or spare paper. Photograph the finished shelf before removal for future reference.
Shelf Wallpaper Questions Answered Simply
What Is Shelf Wallpaper and How Does It Work?
Shelf wallpaper is decorative paper, usually peel-and-stick vinyl, applied to the back panel of a bookcase, cube organizer, or open shelf. It adds color and pattern behind your items, so shelves look styled and custom without any painting, heavy tools, or permanent changes.
Can You Use Peel and Stick Wallpaper on Shelves?
Yes, peel-and-stick wallpaper works on shelves when the back panel is smooth, clean, and dry. Textured, dusty, or unsealed surfaces may not hold the adhesive. Wipe the panel first, test a small corner, and press firmly with a smoothing tool for the best grip.
How Much Wallpaper Do You Need for a Bookcase?
Measure each back panel in inches and add one inch on every side for trimming. A standard five-shelf bookcase usually needs one roll of 20.5 inch wide peel-and-stick paper. Order a small extra amount to cover mistakes and pattern matching.
Will Shelf Wallpaper Damage the Back Panel?
Not usually, if the panel is sealed and you remove the paper slowly with gentle heat. Thin cardboard or raw fiberboard backs can tear or peel. Test a hidden corner first, and consider priming unfinished surfaces before applying removable wallpaper.
What Patterns Suit Dorm Room Shelves Best?
Small florals, checkerboards, stripes, and soft botanical prints suit dorm shelves because they stay pretty behind objects. Choose removable paper, keep the palette to two or three colors, and avoid heavy graphics that hide books and posters for room decor.
How Do You Remove Shelf Wallpaper Cleanly?
Warm the paper with a hair dryer on low for about thirty seconds, lift a corner, and peel slowly at a low angle. Reheat stubborn sections. Clean leftover adhesive with warm soapy water, then let the panel dry before restyling.
Final Thoughts on Your Shelf Wallpaper Project
Shelf wallpaper is one of the easiest ways to add pattern and personality to a room. Start with a single shelf or cube organizer, choose removable paper, and build from there as your confidence and style grow. It is also a reversible, budget-friendly change.
Match the pattern to your space, whether that means dorm-friendly florals, Anthropologie-inspired scallops, or bold geometric prints. Which of these 15 shelf wallpaper ideas will you try first? Share your favorite in the comments and pin your best shelf makeover to Pinterest.
